
Ions Reference
This page covers the basic steps of ion development:
- Prerequisites
- Developing ions
- Packaging ions with push
- Deploying ions to a running compute group
- Invoking ions
It also covers more advanced topics:
Prerequisites
Before you begin developing an ion application, you will need:
- A Datomic system using a split stack
- The Clojure Clojure CLI
- The ion-dev tools
- Git
Developing Ions
This section covers the things you need to know when writing ion code:
- Ion project structure
- Using the Client API from ions
- Implementing ion entry points
- Configuring entry points
- Ion JVM settings
Project Structure
You develop ions in a tools.deps project organized as follows:
- The project must be a git repository – Ions use git SHAs to uniquely name a reproducible revision.
- There should be a single deps.edn file located at the project root. Multiple deps.edn files are incompatible with the use of SHAs to uniquely name a revision.
- The
:depssections of deps.edn must include the client-cloud and ion libraries. - The deps.edn classpath must include a resource named
datomic/ion-config.edn. This resource configures the entry points for an application.
For an example, check the sample project deps.edn and ion-config.edn.
Ion Clients
In an ion application, your client code and Datomic run in the same
process on a compute node. To support this while also supporting
development and testing, you can use the :ion server type as an
argument to client. When you create a client with :ion server-type,
Datomic will create a client based on where your code is running:
- If the code is running on a Cloud node, Datomic will ignore the rest
of the argument map to
clientand create an in-memory ion client - Otherwise, Datomic will use the rest of the argument map to create a client as for the :cloud server-type
Clients created with the
:ionserver type support the synchronous client API only.
The following example shows how to create a client that connects to the inventory-dev system in us-east-1 during development. When deployed as an ion, the same code will create an in-memory client on the system it is deployed to.
(require '[datomic.client.api :as d])

(def cfg {:server-type :ion
          :region "us-east-1"
          :system "inventory-dev"
          :endpoint "https://ljfrt3pr18.execute-api.us-east-1.amazonaws.com"})

(def client (d/client cfg))
Ion Entry Points
Ion applications are arbitrary Clojure code, exposed to consumers via one or more entry points. An entry point is a function with a well-known signature. There are five types of entry points for different callers, each with a different function signature.
Lambda and HTTP direct are external entry points. They expose AWS lambdas and web services, respectively.
Internal entry points are callbacks that extend the Datomic Client API with your code. They include transaction functions, query functions, and pull xforms.
| Entry point | Called from | Input | Output |
|---|---|---|---|
| Lambda | AWS lambda | :input JSON, :context map | String, InputStream, ByteBuffer, or File |
| HTTP Direct | Web client | Web request | Web response |
| Transaction fn | Inside a transaction | Transaction data | Data |
| QQuery fn | Inside query | Data | Data |
| xform | Pulled attribute value | Data | Data |
Lambda Entry Point
A lambda entry point is a function that takes a map with two keys:
:inputis a String containing the input JSON payload.:contextcontains all the data fields of the AWS lambda context as a Clojure map, with all keys (including nested and dynamic map keys) converted to keywords.
A lambda entry point can return any of String, ByteBuffer, InputStream, or File; or it can throw an exception to signal an error.
For example, the following echo function simply echos back its
invocation:
(defn echo
  [{:keys [context input]}]
  input)
Ion deploy automatically creates AWS lambdas that forward requests to your entry points. Your entry points have access to all the resources of your Datomic system and are not constrained by the execution context of AWS lambdas. However, entry point responses must still flow back through AWS lambda to callers, so lambda entry points are bound by the AWS lambda limits on response size (6MB) and response timeout (900 seconds).
HTTP Direct Entry Point
A web entry point is a function that takes the following input map:
| Key | Req'd | Value | Example |
|---|---|---|---|
| :body | No | InputStream | "hello" |
| :headers | Yes | Map string->string | {"x-foo" "bar"} |
| :protocol | Yes | HTTP protocol | "HTTP/1.1" |
| :remote-addr | Yes | Caller host | "example.com" |
| :request-method | Yes | HTTP verb as keyword | :get |
| :scheme | No | :http or :https | :https |
| :server-name | Yes | Server host name | "example.com" |
| :server-port | No | TCP port | 443 |
| :uri | Yes | Request URI | / |
And returns:
| Key | Req'd | Value | Example |
|---|---|---|---|
| :body | No | InputStream or String | "goodbye" |
| :headers | Yes | Map string->string | {"x-foo" "bar"} |
| :status | Yes | HTTP status code | 200 |
The input and output maps are a subset of the Clojure ring spec, and many web applications should be able to run unmodified as HTTP direct ions.
The ion-starter project includes an example HTTP direct ion.
ion-config.edn
The datomic/ion-config.edn resource configures the application's entry points. Ion-config is an EDN map with the following keys:
:app-nameis string name of a Datomic application.:allowis a vector of fully qualified symbols naming query or transaction functions. When you deploy an application, Datomic will automatically require all the namespaces mentioned under:allow.:xformsis a vector of fully qualified symbols naming functions for use in xform.:lambdasis a map configuring AWS lambda entry points:http-directis a map configuring an HTTP direct entry point.
:lambdas
:lambdas is a map from lambda names (keywords) to lambda configurations.
For each entry in the :lambdas map, ion deploy will create an
AWS lambda named $(group)-$(name), where group is the :group key
you used to invoke deploy, and name is the name is the lambda
name. AWS lambda names are limited to 64 characters, so make sure that
you choose a lambda name that will not exceed this when appended to
your group name.
A lambda configuration supports the following keys:
| Key | Required | Value | Example | Default |
|---|---|---|---|---|
| :fn | Yes | Symbol | datomic.ion.starter/echo | |
| :description | No | String | "echo" | "" |
| :timeout-secs | No | Positive int | 60 | 60 |
| :concurrency-limit | No | Positive int or :none | 20 | 20 |
| :integration | No | :api-gateway/proxy | :api-gateway/proxy |
:concurrency-limit sets
AWS reserved concurrency.
Set it :none if you want the AWS lambda to use unreserved concurrency.
The :integration key customizes integration between the lambda and
AWS. The only value currently supported is :api-gateway/proxy. Set
this only for web Lambda proxies.
HTTP Direct Configuration
The HTTP Direct configuration map supports the following keys:
| Key | Required | Description | Default |
|---|---|---|---|
| :handler-fn | Yes | Fully qualified handler function name | |
| :pending-ops-queue-length | No | Number of operations to queue | 100 |
| :processing-concurrency | No | Number of concurrent operations | 16 |
| :pending-ops-exceeded-message | No | Return message when queue is full | "Throttled" |
| :pending-ops-exceeded-code | No | HTTP status code returned when queue is full | 429 |
Nodes will enqueue up to :pending-ops-queue-length HTTP direct
requests, servicing them with :processing-concurrency
threads. When the ops queue is full, nodes will reject requests with
:pending-ops-exceeded-messsage and :pending-ops-exceeded-code.
You can use the HttpDirectOpsPending and HttpDirectThrottled
metrics to monitor your application and autoscale query groups.
Ion-Config Example
The example below is taken from the ion-starter project:
{:allow [;; transaction function
         datomic.ion.starter/create-item

         ;; query function
         datomic.ion.starter/feature-item?]

 ;; AWS Lambda entry points
 :lambdas {:echo
           {:fn datomic.ion.starter/echo
            :description "Echos input"}
           :get-tutorial-schema
           {:fn datomic.ion.starter/get-tutorial-schema
            :description "returns the schema for the Datomic docs tutorial"}
           :get-items-by-type
           {:fn datomic.ion.starter/get-items-by-type
            :description "Lambda handler that returns items by type"}}

 ;; HTTP Direct entry point
 :http-direct {:handler-fn datomic.ion.starter/items-by-type}
 :app-name "<YOUR-APP-HERE>"}
JVM Settings
When developing and testing locally, it can be helpful to match the JVM settings that your code will run under in Datomic Cloud.
| Instance type | Heap (-Xmx) | Stack (-Xss) |
|---|---|---|
| t3.small | 1189m | 512k |
| t3.medium | 2540m | 1m |
| t3.large | 5333m | 1m |
| t3.xlarge | 10918m | 1m |
| i3.large | 10520m | 1m |
| i3.xlarge | 21280m | 1m |
Additionally, all instances use the following flags:
-XX:+UseG1GC -XX:MaxGCPauseMillis=50 -Dclojure.spec.skip-macros=true
Push
Ion /push/package your application into runnable artifacts. Push creates an AWS CodeDeploy application revision in S3 that can later be deployed to one or more compute groups. Ion push understands your dependencies at a granular level, so e.g. all revisions can share the same copy of a common library. This is more efficient than "uberjar" style deployment.
To push an application revision, call datomic.ion.dev with an :op of
:push:
clojure -A:ion-dev '{:op :push (options)}'
| Keyword | Required | Value | Example |
|---|---|---|---|
| :op | Yes | :push | :push |
| :uname | No | Unreproducible name | "janes-wip" |
| :creds-profile | No | AWS profile name | "janes-profile" |
| :region | No | AWS region | "us-east-1" |
Push will ensure that your application's dependencies (Git and Maven libs) exist in your ion code bucket:
s3://$(ion-code-bucket)/datomic/libs
And will create an application revision located at:
s3://$(ion-code-bucket)/datomic/apps/$(app-name)/$(git-sha|uname).zip
On success, push returns a map with the following keys:
| Keyword | Required | Value |
|---|---|---|
| :rev | No | Git SHA for the commit that was pushed |
| :uname | No | Unreproducible name for the push |
| :deploy-groups | Yes | List of available groups for deploy |
| :deploy-command | Yes | Sample command for deploy |
| :doc | No | Documentation |
| :dependency-conflicts | No | Map describing conflicts |
Dependency Conflicts
Because ions run on the same classpath as Datomic Cloud, it is possible for ion dependencies to conflict with Datomic's own dependencies. If this happens:
- Datomic's dependencies will be used
- The return from push will warn you with a
:dependency-conflictsmap - You can add the
:depsfrom the conflicts map to your local project so that you can test against the libraries used by Datomic Cloud
The Datomic team works to keep Datomic's dependencies up-to-date. If you are unable to resolve a dependency conflict, please contact support.
Unreproducible Push
By default, an ion push is reproducible, i.e. built entirely from artifacts in git or maven repositories. For a push to be reproducible, your git working tree must be clean, and your deps.edn project cannot include any local/root dependencies. A reproducible push is uniquely named by the SHA of its git commit.
In some situations, you may want to push code that Datomic does not know to be reproducible. For example:
- You are testing work-in-progress that does not have a git commit
- You are implementing your own approach to reproducibility
For these situations, ions permit an unreproducible push. Since an
unreproducible push has no git SHA, you must specify an unrepro name
(:uname).
You are responsible for making the uname unique within your application. If unames are not unique, ions will be unable to automatically roll back failed deploys.
Deploy
Ion deploy deploys a pushed revision to a compute group.
When you deploy, Datomic will use AWS Step Functions to
- CodeDeploy the code for the application onto each instance in the compute group.
- Automatically roll back to the previous deployment if the application does not deploy correctly (e.g. if loading a namespace throws an exception).
- Ensure that active databases are present in memory before routing requests to newly updated nodes.
- Ensure that all the lambdas requested via the ion-config.edn map exists and are configured correctly.
Node deployment happens one node at a time, so a Datomic system will remain available with N-1 members active throughout a deployment.
To deploy an application, call datomic.ion.dev with an :op of
:deploy:
clojure -A:ion-dev '{:op :deploy (options)}'
| Keyword | Required | Value | Example |
|---|---|---|---|
| :op | Yes | :deploy | :deploy |
| :group | Yes | C ompute group name | "my-datomic-compute" |
| :rev | (Or :uname) | Output from push | "6468765f843d70e01a7a2e483405c5fcc9aa0883" |
| :uname | (Or :rev) | Input to push | "janes-wip" |
| :creds-profile | No | AWS profile name | "janes-profile" |
| :region | No | AWS region | "us-east-1" |
The time to complete an entire deployment is the sum of:
- the sum of times to deploy to each node
- the time to (re)configure lambdas
The time to deploy to a single node is the sum of
- The time to copy new code and deps from S3 to the node
- The time to stop and restart the Datomic Cloud process
- The time to load active databases into memory
Deployment to a single node can take from 20 seconds up to several minutes, depending on the number and size of active databases.
You can monitor a deployment with the deploy-status command or from the AWS Console.
Deploy-Status
To check the status of a deploy, call datomic.ion.dev with an :op of
:deploy-status:
clojure -A:ion-dev '{:op :deploy-status ...}'
| Keyword | Required | value | Example |
|---|---|---|---|
| :op | Yes | :deploy-status | :deploy-status |
| :execution-arn | Yes | Output from deploy | "arn:aws:states:us-east-1:123456789012:execution:datomic-compute:datomic-compute-1526506240469" |
| :creds-profile | No | AWS profile name | "janes-profile" |
| :region | No | AWS region | "us-east-1" |
Deploy status returns the the Step Functions reference of the overall ion deploy and the code deploy as a map:
{:deploy-status "SUCCEEDED"
 :code-deploy-status "SUCCEEDED"}
On success, both the overall ion deploy and code deploy status will eventually, return with "SUCCEEDED"
Console Status
You can monitor a deploy in near real-time from the Step Functions Console. Look for a state
machine named datomic-$(group).
The CodeDeploy step can be monitored in the CodeDeploy Deployments console.
Invoking Ions
Ion entry points that extend the power of the Client API are described in the relevant documentation sections:
Web service and lambda invocations are described below.
Invoking Web Services
Ion web services are exposed at the URL https://$(IonApiGatewayEndpoint), where IonApiGatewayEndpoint is in your compute group's template outputs. You can invoke a web service with any HTTPS client, e.g. curl:
curl https://$(IonApiGatewayEndpoint)
If your compute template does not have an IonApiGatewayEndpoint, see
older versions of Datomic.
Invoking Lambdas
When you deploy an application with lambda ions, Datomic will create AWS lambdas named:
$(group)-$(name)
Where group is the :group key you used to invoke deploy, and
name is the name under the :lambdas key in ion-config.edn.
The tutorial includes an example of invoking an ion Lambda via the AWS CLI.
Configuring Compute Groups
Ions typically have some amount of configuration, e.g. the name of a Datomic database that they use. If you are deploying your ion application to a single compute group, then you might choose to keep such configuration in Clojure vars in your application source code. This is easy, if not simple:
- Everything is in a single place. For small services, it may even fit in a single screen of Clojure code.
- Code and configuration are versioned together on every ion push.
If you have more complex ions, potentially deployed to multiple compute groups (or even multiple systems), there are several challenges to consider:
- Configuration values may have a lifecycle that is independent of application source code. They should not be hard-coded in the application and should be managed separately from the source code.
- Applications need a way to obtain their configuration values at runtime.
- Configuration values may be sensitive, and should not be stored or conveyed as plaintext.
- Configuration values may need to be secured at a granular level.
Datomic Cloud provides tools to help with these challenges.
- The compute group app-info map describes the compute group
- The compute group environment map lets you add your own configuration, per compute group
- Parameters allow you to create a configuration with arbitrary scope and lifecycle, and secure them at fine granularity with IAM
| Configuration | Scope | Source | IAM |
|---|---|---|---|
| App-info map | Compute group | Datomic | No |
| Environment map | Compute group | User | No |
| Parameters | Arbitrary | User | Yes |
App-Info Map
If you deploy the same ion to different compute groups, your code may
want to be conditional based on which group it is running in. You can
discover your compute group at runtime with
get-app-info, which takes no arguments, and
returns a map that will include at least these keys:
:app-nameis your app-name:deployment-groupis the name of your ion deployment group
For example, the following excerpt from deploy-monitor gets the app-name:
(get (ion/get-app-info) :app-name)
When running outside Datomic Cloud, get-app-info returns the value
of the DATOMIC_APP_INFO_MAP environment variable, read as EDN.
If you want to add your own per-compute-group configuration, you can create an environment map.
Environment Map
You create an environment map when you first create a compute
group. For example, the environment map below specifies that a compute
group is for a :staging deployment environment:
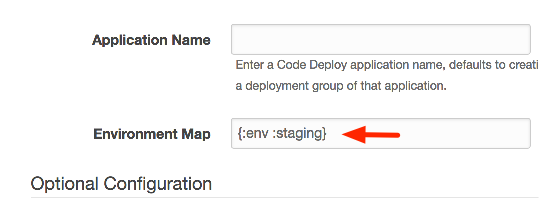
You can then retrieve the environment map at runtime with
get-env, which takes no arguments, and returns the environment
map.
For example, the following excerpt from deploy-monitor retrieves the deployment environment specified above:
(get (ion/get-env) :env)
You can set the environment map for local development via the
DATOMIC_ENV_MAP environment variable. When running outside Datomic
Cloud, get-env returns the value of DATOMIC_ENV_MAP, read as EDN.
If you need to change the environment map for a running compute group, you can update the group's CloudFormation stack.
If you need a more flexible lifecycle or granular security, you can use parameters as described below.
Parameters
- A parameter is a named slot known to application code that can be filled in with a specific parameter value at runtime
- The AWS Systems Manager Parameter Store provides an implementation of parameters that support an independent lifecycle, encryption for sensitive data, and IAM security over a hierarchical naming scheme
- Inside a given AWS account and region, all Datomic cluster nodes
have read permission on parameter store keys that begin with
datomic-shared - The ion library provides
get-paramsas a convenience for reading parameter store parameters
Get-Params
The get-params function is a convenience abstraction over
GetParametersByPath. get-params take a map with a :path key, and
it returns all the parameters under the path as a map from the parameter name
string to parameter value string, decrypting if necessary.
For example, the call to get-params below returns all the parameters
under the path /datomic-shared/prod/deploy-monitor.
(ion/get-params {:path "/datomic-shared/prod/deploy-monitor"})
Per-System Permissions
The datomic-shared parameter prefix is readable by all Datomic
systems in a particular AWS account and region. If you want more
granular permissions, you can choose your own naming convention (under
a different prefix), and explicitly add permissions to the IAM policy
for your Datomic nodes.
Configuration Example
The deploy-monitor sample application demonstrates using app-info, the environment map, and parameters together. First, the environment and app-info map are used to create a key prefix following the the naming convention:
/datomic-shared/(env)/(app-name)/
datomic-sharedis a prefix readable by all Datomic nodesenvis taken from the environment map, and differentiates different environments for the same application, e.g. "ci" vs. "prod"app-nameis the ion app-name
Then, this prefix is used to name configuration keys in the parameter store. Deploy-monitor needs four parameters:
- A Datomic database name
- A Slack channel
- Two encrypted tokens for Slack
Given this convention, the following AWS CLI commands will create the parameters for the "prod" environment:
# actual parameter values not shown
aws ssm put-parameter --name /datomic-shared/prod/deploy-monitor/db-name --value $DB_NAME --type String
aws ssm put-parameter --name /datomic-shared/prod/deploy-monitor/channel --value $CHANNEL --type String
aws ssm put-parameter --name /datomic-shared/prod/deploy-monitor/bot-token --value $BOT_TOKEN --type SecureString
aws ssm put-parameter --name /datomic-shared/prod/deploy-monitor/verification-token --value $VERIFICATION_TOKEN --type SecureString
You could use similar commands to create parameters for additional environments.
At runtime, deploy-monitor uses get-app-info and get-env to load
the information needed to create a Parameter Store path, and then
reads all of its parameter values with get-params:
(def get-params
  "Returns the params under /datomic-shared/(env)/(app-name)/, where

env       value of get-env :env
app-name  value of get-app-info :app-name"
  (memoize
   #(let [app (or (get (ion/get-app-info) :app-name) (fail :app-name))
          env (or (get (ion/get-env) :env) (fail :env))]
      (ion/get-params {:path (str "/datomic-shared/" (name env) "/" app "/")}))))
Naming Applications
When you create a compute group, you specify an AWS CodeDeploy application name to be used for deploying ions. By default, this name is the same as the name of your compute group.
Override the default and choose a common application name if you plan to have multiple compute groups run the same code, e.g. different development stages of the same application. For example, you might have two systems "inventory-staging" and "inventory-production", with the intent that code deployed to production has always been deployed and tested in staging first. You can give the compute groups in both systems a shared application name "inventory" when you create their compute stacks.
The application name cannot be changed after a compute group is created. If you need a different application name, simply delete the compute group and create a new one.
Best Practices
- Ions are designed to let you do most of your development and testing at a Clojure REPL, with a much faster feedback look than push/deploy. Take advantage of this wherever possible.
- You do not need ions, or a Datomic Cloud system, to get develop and test Datomic applications. You can start with dev-local, and when you are ready for ions, make your code portable with divert-system.
- Do not store AWS credentials in the Parameter Store, as Datomic Cloud fully supports IAM roles.
- The tools.deps classpath is the source of truth for an ion revision. If you need a file for local development that you do not want deployed, you should add that file's directory with a tools.deps alias. (You cannot e.g. "subtract" the file with a .gitignore. Ions use git only for calculating a SHA.)
- Provision AWS lambda concurrency to mitigate cold starts.
- If you have dependencies that are needed only in dev and test, place them under a tools.deps alias so that you do not deploy them to production.
Older Versions of Datomic Cloud
Datomic versions 781-9041 (2021-03-02) and older do not manage an API Gateway for ion applications. If you are running an older version of Datomic, the easiest way to deploy web services is to upgrade Datomic and follow the instructions above.
If this is not possible, the instructions below cover managing your own API Gateway. The instructions vary based on your system topology. For Datomic Solo, you can connect an API Gateway to a web lambda proxy. For Production, you can connect an API Gateway to your Network Load Balancer.
Web Lambda Proxies
If you are running the Solo Topology, version 781-9041 and older, you can expose a web service using API Gateway Lambda Proxy integration.
To deploy a Lambda proxy web endpoint, you will need to:
- Develop and test an ordinary web entry point
- Create a web lambda entry point with ionize
- Configure an API Gateway
Create a Web Lambda Proxy Entry Point
Given a var that implements a web entry point, you can create a Lambda
proxy entry point by calling ionize. Ionize takes a web entry point
function and returns a function that implements the special contract
required by a lambda proxy.
The ion-starter sample project has an example:
(def get-items-by-type-lambda-proxy
  (apigw/ionize get-items-by-type))
You should then name this lambda proxy as a Lambda entry point (not an HTTP Direct entry point!) in your ion-config.
Again, the ion-starter sample project has an example.
The input map for web lambda proxies includes the following additional keys:
| Key | Req'd | Value | Example |
|---|---|---|---|
| :json | No | api-gateway/json | {"resource":"{proxy+}","path":"datomic","httpMethod":"POST" … } |
| :data | No | api-gateway/data | {"Path": "/datomic","Querystringparameters": null, "Pathparameters": {"Proxy": "datomic"}… |
Configure an API Gateway for a Web Lambda Proxy
After you push and deploy an ion application with a web Lambda Proxy entry point, you can create an API gateway as follows:
- Go to the
AWS API gateway console to create a new AWS API gateway.
- If this is the first AWS API Gateway you are creating, choose "Get started".
- Then click "Ok" and choose the "New API" radio button.
- If you have existing AWS API Gateways, choose "Create API".
- Give your API a unique name, e.g. "ion-get-items-by-type". Leave the other default settings.
- Click "Create API" in the bottom right.
- Under the "Actions" dropdown, choose "Create resource".
- Check the box "Configure as proxy resource."
- Other fields will be updated with defaults. Leave these as is.
- If you will need to support CORS, then select the "Enable API Gateway CORS" option. This will set up an OPTIONS method with a Mock Integration Request which can be changed to fit your needs.
- Click "Create resource".
- Set the lambda function to the
name of your Lambda proxy
and click "Save".
- Note that the autocomplete does not always work correctly on this step, so trust and verify your own spelling.
- Choose "Ok" to give API Gateway permission to call your lambda.
- Under your API on the left side of the UI, click on the bottom choice "Settings".
- Choose "Add binary media type", and add the
*/*type, then "Save changes".
You can then deploy your API gateway on the public internet:
- Select your API name (if you have not already), and choose Deploy API under the Actions dropdown.
- Choose "New stage" as the deployment stage.
- Choose a "Stage name", then choose "Deploy".
The top of the Stage Editor with show the Invoke URL for your deployed
app. Your service will be available at the path
https://$(Invoke URL)/datomic.
API Gateway to Network Load Balancer
If you are running the Production Topology, version 781-9041 and older, you can expose a web service by connecting an API Gateway to a compute group's Network Load Balancer as follows:
- Develop and test an ordinary web entry point
- Create a VPC Link
- Configure an API Gateway
Create a VPC Link
The list of all VPC Links active in your system can be found in the API gateway console.
- Create a VPC Link in the AWS console.
- In the "Target NLB" dialog, choose the NLB for your Datomic Cloud system.
- The NLB will be selectable from a dropdown.
- The NLB name can be found in the Outputs tab of your compute or query group CloudFormation template entry under the LoadBalancerName key.
- The newly created VPC Link will show
Status: Pendingfor some time. Wait until the status changes toAvailablebefore proceeding to - Create an API Gateway that uses the VPC link.
Create an API Gateway
To create an API Gateway associated with a specific VPC link:
- Ensure that the VPC Link that you created in the previous step shows "Status: Available".
- Go to the AWS API Gateway console;.
- If this is the first AWS API Gateway you are creating, choose Get Started.
- Then click "Ok" and choose the "New API" radio button.
- If you have existing AWS API Gateways, choose "Create API".
- Give your API a unique name, leave the other default settings.
- Click "Create API" in the bottom right.
- Under the "Actions" dropdown, choose "Create resource".
- Check the box "Configure as proxy resource*".
- Other fields will be updated with defaults. Leave these as is.
- Click "Create resource".
- Select VPC Link as the "Integration type".
- Check the box "Use proxy integration".
- Select the desired VPC Link target for this API gateway from the dropdown box.
Enter your
http://$(NLB URI):port/{proxy}as the "Endpoint URL". This NLB URI can be found in the outputs tab of your compute or query group CloudFormation template entry under the "LoadBalancerHttpDirectEndpoint" key: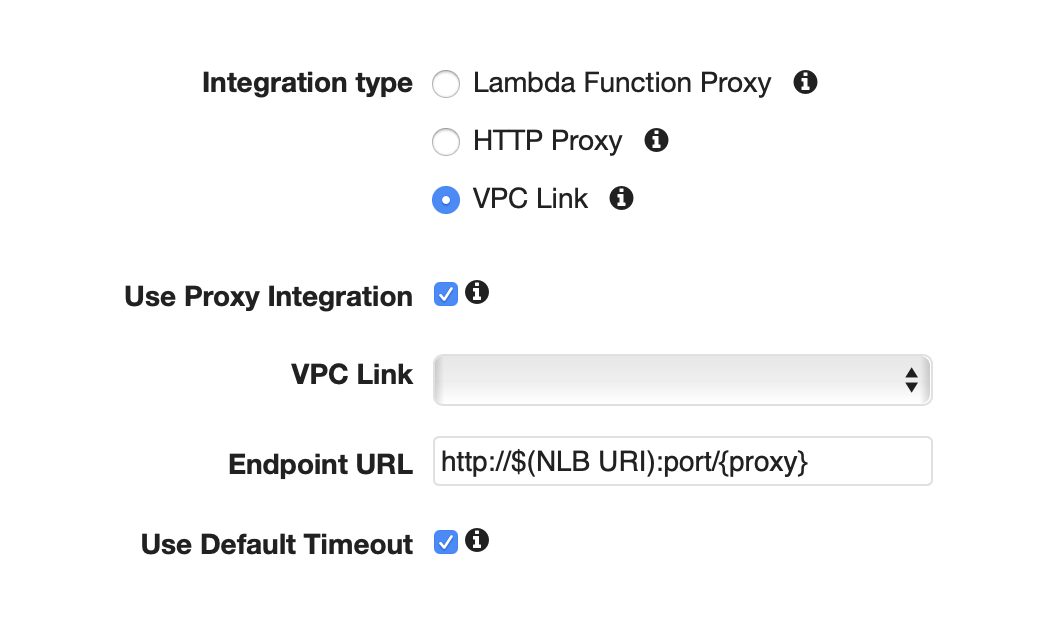
- Click "Save".
You can then deploy your API gateway on the public internet:
- Select your API name (if you have not already), and choose "Deploy API" under the "Actions" dropdown.
- Choose "New stage" as the deployment stage.
- choose a stage name, then choose "Deploy".
The top of the Stage Editor with show the Invoke URL for your deployed
app. Your service will be available at the path https://$(Invoke URL)/datomic.